We’ve already established the importance of editing your photos in the last post and the various photo editing tools available. This time let’s look at 10 quick and simple ways to enhance your photos and bring them to life.
The tool I often use for editing my photos is Lightroom, so the examples below were edited using this tool. Though I am a long-time Photoshop user, I found that I needed a program that could allow me to quickly edit and organize photos. You should still be able to make similar edits in most programs with the exception of free tools. They may have some of these editing features and not all. In that case, you can decide what’s most important to you or try other free options to see if they have what you need.

Comparison of food vendor before editing (left) and after (right).
10 Tips to Enhance Your Photos
The following are ten quick and simple tips you can use to enhance your photos. It’s up to you what edits to make and the degree of change you want. All photos are not the same and the edits you decide to make will depend on your vision for the final image.
1. Crop / Straighten
Anything that doesn’t help contribute to the image should be cropped out. Look around the edges of the photo for anything that may be distracting or would divert attention away from the main subject matter. Make sure horizons are level where the sky and ground meet.
2. Temperature (White Balance)
Color can dramatically affect the mood of an image and help tell the story. Warm colors and tones that include reds, oranges and yellows often relay energy, liveliness and are more welcoming. On the other hand cool colors such as blues, greens and purples are more calm, quiet and tend to recede. Changing the color tone in an image can dramatically alter the mood.
3. Contrast
Often we are visually attracted to opposites and by enhancing contrast (light and dark) in an image, it can help the subject in the image pop out. Too much contrast though can be jarring to the eyes. Often times only a small adjustment is needed, but this will depend on the original light levels captured in the image.
4. Clarity
Clarity can help bring out details in an image that are not as well defined initially. Depending on your subject matter, it can help to increase clarity where there are lots of details. For example the veins in a leaf or the texture of an old wood building might be good for enhancing clarity for a richer image.
5. Vibrance
Often you’ll want to increase vibrance rather than saturation when you only want to increase the saturation of more muted colors in an image. Vibrance takes care of not overly saturating the colors that are already well-saturated to avoid some colors from blowing out.
6. Saturation
Increasing saturation will equally increase the saturation levels of all colors in an image. Decreasing saturation will do the opposite and at the extreme end it will turn an image into black and white. Lowering the saturation creates a faded effect which is often how the look of an old and worn out photo is achieved.
7. Tone Curve

Tone Curve in Lightroom
A common method of increasing the lights and darks in an image is to adjust the tone curve. The default is usually a diagonal line starting at the bottom left going up towards the top right of the graph. Shadows are affected by adjusting the line near the bottom left, while highlights are adjusted in the upper right. Everything in between affects the midtones. By clicking and dragging the line up or down, you can increase or decrease lights and shadows.
8. Sharpening
Sharpening a photo will increase the definition of edges in an image and help to separate the subject from the background. Sometimes increasing the sharpness of an image may also increase noise, so you may want to apply some noise reduction or avoid increasing sharpness too much.
9. Lens Correction
Depending on the lens you used, you may encounter some distortion near the edges of the photo. This effect usually occurs with wide angle lenses. The lens correction feature will allow you to eliminate the distortion by bringing in the edges of the image. However, you may need to crop the image to cut out the grey that’s being revealed where the distortion has been fixed.
10. Highlight Priority or Vignette
I like to use this tool to darken the edges of the photo and draw the eyes into the image. This feature helps focus attention towards the subject matter and keep the eyes from straying off the photo.
Before and After Comparisons

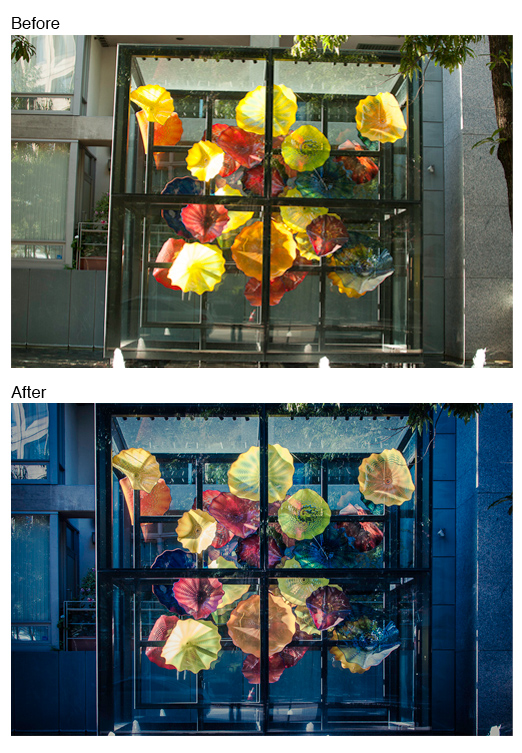
Here you can see that I’ve applied lens correction to the image of the Chihuly glass installation above. I’ve also further adjusted the vertical tilt and straightened the image for straighter lines. These adjustments help eliminate distractions to the eye and focus on the subject of the image — the organic shapes and bright colors of the art piece. I’ve also dramatically altered the temperature from what was originally a warm tone to a much colder tone to help create color contrast between the colorful art and its surroundings. A bit of vignetting was added to focus the eye’s attention to the center as well. In this case I dropped the saturation levels as the bright colors seemed a bit over-saturated and bumped up the vibrance instead.

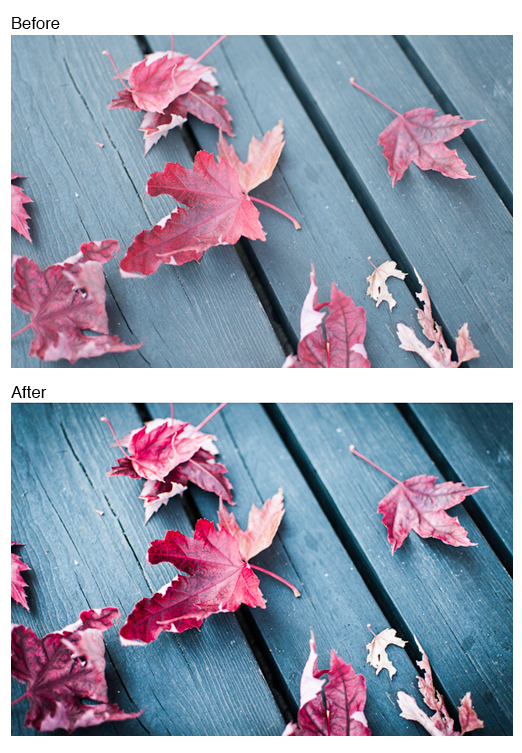
In this example, I changed the temperature slightly to create a cooler wood tone for color contrast from the red leaves. Contrast and clarity were also increased to help the leaves pop out from the wood bench and reveal more detail in the textures of the leaves and wood. I increased saturation in the red leaves for more color and pop. A little sharpening was applied as well as a bit of a dark vignette to help focus attention towards the center of the image.

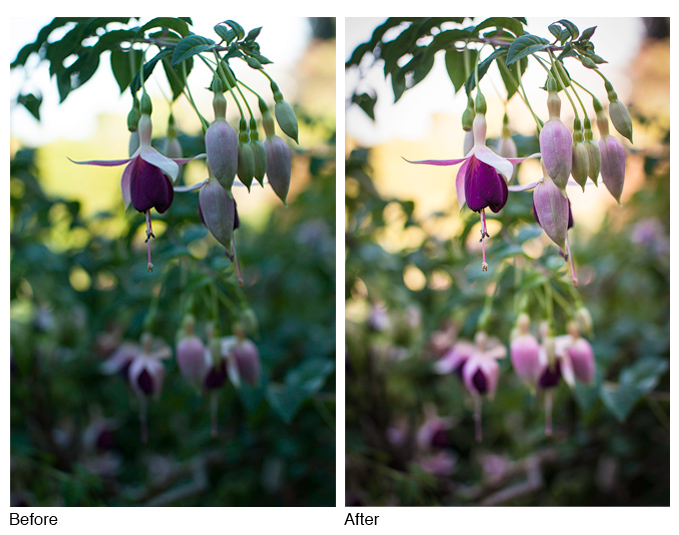
In this image, I added fill light to bring out the flowers from the background and warmed up the color temperature just a bit. Some clarity and sharpening were added and a very subtle vignette. These small changes have already helped enhance the image greatly and required very little time.
Of course there are more ways to edit your images besides the ten tips I listed, but these are just some quick and simple ways to enhance your photos. Not much time was spent editing these photos, but as you can see the minimal time spent editing them resulted in a much improved image. Post processing your work should be part of the creative process and can be just as much fun as taking the photos. By putting in a little effort, you’ll improve the quality of your photos and over time develop your photographic vision.

